

- July 28, 2021
- FOXITBLOG

Fillable forms are a fast and simple way to collect information. They’re especially useful if you’re a business owner, or if your job involves collecting information from customers.
A fillable form can be shared within seconds, unlike paper forms that may have to be mailed or require a client to drive to a face-to-face meeting. This document collaboration tool can help improve workflows because it offers the following benefits:
- You can save time and money by using fillable forms.
- Reduces errors. A fillable form streamlines the information-gathering process, ensuring that every recipient receives the same data. This will ensure that all fields are filled out by the recipient without any mistakes.
- Enhances customer experience. An easy-to-navigate, clean, and professional fillable form will make your clients or colleagues feel better about getting work accomplished.
- Saves trees by eliminating paper forms.
- Protects information. Fillable form documents are more secure than paper documents because you can add a password to increase security.
Here are a few tips that show you how to make a PDF fillable as a form so that your users enjoy a streamlined experience when filling out PDF forms.

First, get the right PDF tool to create a fillable PDF form
Foxit PDF Editor is a great choice for this task. With the Run Form Field Recognition tool, it includes a way to automatically turn a static form into a fillable PDF form.
That’s the fastest, easiest method to change a PDF form into a fillable PDF form. And when you’re deciding how to make a PDF fillable, it’s a smart way to go.
Foxit PDF Editor will also allow you to manually add text boxes, drop-down menus, push buttons, text fields, check boxes, combo boxes, list boxes and radio buttons to your PDF form and specify their properties. This makes it easy to input information into your fillable PDF form.
In addition, you can design the form layout and appearance to match your brand or style.
Plus, Foxit PDF Editor makes it easy to distribute your form electronically and collect responses electronically, so you can save time and paper.
If you don’t have Foxit software, you can install the Foxit PDF Editor.
Second, familiarize yourself with your unfillable forms before you turn them into fillable forms
This will help you understand where to input form fields, how the information flows, and how the form is structured.
Keep in mind that your form is often the only thing that stands between the user’s goal and realizing it when they visit your website or use your app.
Users still use forms on the web and in mobile apps as one of their most essential interactions. With all this in mind, your PDF forms should be easy to use and understand by users.
You can get more tips on good form design.
How to create fillable PDF forms with Foxit PDF Editor
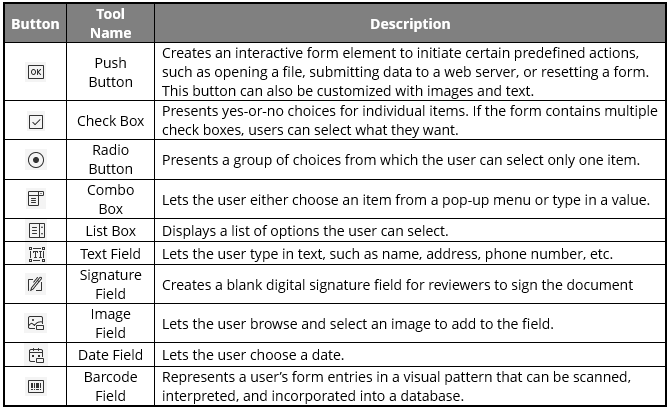
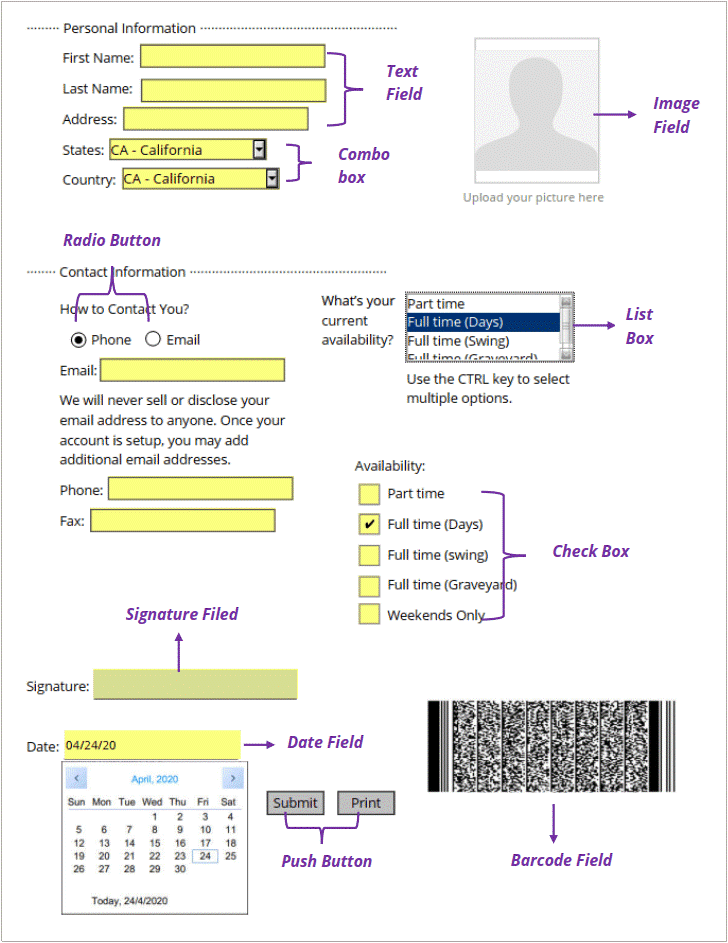
Foxit PDF Editor provides a group of buttons that can be used to create and design form fields in interactive PDF forms. You are able to add form fields like push buttons, text fields, check boxes, combo boxes, list boxes and radio buttons to an interactive PDF to add fillable form fields and specify their properties.
To add a form field to an existing PDF document, select a type of form field button from the Form tab and the cursor changes to a crosshair ![]() .
.
Drag an area in the desired position to add the form field.
There are ten buttons to add form fields for you to create an interactive PDF with fillable form fields. They enable you to create push buttons, check boxes, radio buttons, combo boxes, a list box, text fields, signature fields, image fields, date fields and barcode fields:
How to recognize form fields and make them fillable in PDFs
There are two commands for form field recognition in PDF forms: Designer Assistant and Run Form Field Recognition.
The Designer Assistant command automatically detects form fields that can be created on PDF pages and displays a blue frame where there is a suggested form field.
By default, when you select any type of form field button from the Form tab, the Designer Assistant command will be selected and enabled automatically. With any type of form field button selected, as you move the cursor on the page, a blue frame appears if the cursor is hovering above an area which is detected as a form field.
If you want to add a form field at that position, just click on it without dragging an area. And if there are multiple form fields detected, you can complete the form field creation with just a few clicks.
Plus, here’s a pro tip on using the Designer Assistant
You can disable the auto-detection by clicking the Designer Assistant command again when you are creating form fields. Then the command will no longer be selected automatically next time you create form fields. To enable it again, select the command before you create form fields.
Use the Run Form Field Recognition command to recognize form fields through the whole document in seconds
Alternatively, you can use the Run Form Field Recognition command to recognize form fields through the whole document. To run form field recognition in a PDF document, do as the following:
- Click Form > Run Form Field Recognition. All the fillable form fields in the document will be recognized and highlighted.
- All the corresponding types of form fields will be automatically created and named with the text near the form fields.
For example, look at the text fields below. With the Text Field command selected, you can see the form fields recognized and created are named with the text near the form fields.
- You can edit or delete the created form fields after right-clicking them. To edit the form field further, please refer to the instruction on the properties of “Push Button”.

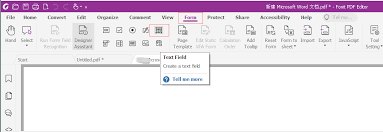
Create a fillable PDF form using Microsoft Word
Follow these steps to create a form in Microsoft Word and then turn it into an editable PDF form using Foxit PDF Editor form tools:
- Open a template or a blank document on which to base the form in Microsoft Word.
- To start with a form template, go to File > New. In Search online templates, type Forms or input the kind of form you want and press ENTER. Next, choose a form template, and then select Create or Download.
- To start with a blank document, go to File > New, then select Blank document.
- Add content to your form. Type underscores wherever you want fillable fields.
- Save As a PDF. To export your Word document to a PDF, go to File > Select Format, change the file format to PDF, and click Export.
- Right-click the file, then select Open with Foxit PDF Editor from the context menu. If you don’t have Foxit PDF software, you can download it.
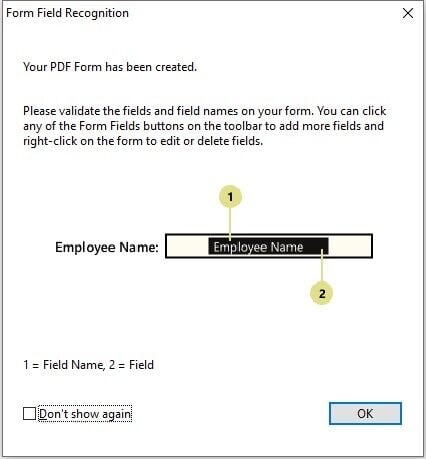
- Create the form. Choose Form > Run Form Field Recognition. Foxit PDF Editor will automatically convert your underscores into fields. Next, a dialogue box will pop up letting you know that your form has been created, asking you to validate the fields, and telling you that you can add more fields, if you wish.
6. Save the form. Once you’re satisfied with your fillable form results, click File > Save As to save the document.
Create an online form from a Microsoft Word document
Follow these steps to create a PDF fillable form from a Word document using Foxit PDF Editor:
- Open Foxit PDF Editor. Then go to Convert > Form > From a File. Select your Microsoft Word document and click Open.
- . Once the conversion has been completed, the newly created form will automatically be opened in Foxit PDF Editor.
- Unrecognized forms can be fixed. Click Form > Designer Assistant> Text Field on the toolbar to create an interactive field in the table cell.
When you convert static forms to interactive forms, your completion rate and accuracy will improve. It makes sense to convert Word files into PDF forms.
Try Foxit PDF Editor today for Free!
PDFs are a great way to share information, but they can be a pain to edit. That’s where Foxit’s PDF Editor comes in.
It’s easy to use and lets you create fillable PDFs and forms with just a few clicks. Plus, it’s free to try!
So why not give it a shot today? you might be surprised at how easy it is to get started.
Finally, don’t hesitate to reach out for help if you’re having trouble. Our 24/7 customer service experts are awesome. In fact, our customer support is consistently rated among the best in the business by our customers. And you get to speak to a real person any day, any time.
We hope this has been a valuable resource to show you how to create a fillable PDF and create PDF forms correctly. By following these simple tips, you can make sure that filling out PDF forms is easy and stress-free.
This seems to be useless if you need to start from scratch. I have a form made in a different program that it cannot recognize so I cannot update. I tried to start over from scratch but the program is not easy to navigate or find solutions. I have searched your pages looking for help, I have googled looking for help. Why is it so hard to build from scratch? Been trying for nearly 2 hours to figure out how to put a stupid background color in a header. Plenty of directions on font color, I need background and not entire page, just the header. This is NOT a user friendly program. Will be asking IT to cancel and request a refund.
Hi Tracey! When you add the existing form did you try the button “Run Form Field Recognition” under the “form” tab in Foxit PDF Editor?
We have a tutorial on how to create fillable PDF forms which you might find helpful: https://www.foxit.com/support/tutorial.html?open=phantom-Interactive-Forms
Here’s a workaround for the header background: You can add a rectangle on the top of your page. To do so please go to Comment > Drawing > Rectangle. Draw the rectangle where you want it and adjust the size if necessary. In the panel on the right side, you can set the line color, fill color, and opacity. You can copy and paste the rectangle to put it on the other pages. When you’re done right mouse click the rectangle choose “Properties”, and then check “Locked”, and the rectangle can’t be moved anymore. Hope this helps. In case you still need help, please contact our support.
Can Phantom create fillable forms that are expandable? The scenarios:
1. A text box that is appeared one line initially on the form but allow user to enter more text and it automatically expand to multiple line. This would allow a product description text box accepting a wide range of content sizes. Some product description can extend to a dozen of lines.
2. Create a table for order item entry with at least one item but a user can add more rows in order to add more items.
3. When the content is extended into another page, the content must be properly separated with header and footer in place on each page.
If Phantom can do these, can you share a link to the document that shows how to do these, please?
Jack, please submit a ticket via Support Portal to get support on this.
Did you get an answer to that? Please share the answer. Thanks
The pop-up window for properties almost never shows up when right-clicking the form I have created. It maybe launches the properties pop-up window about 15% of the time. Very frustrating and unable to use this functionality.
Hi Ryan, please submit a ticket a support ticket via Support Portal
Is there a simple way to bring in States, Country’s, Time Zones, etc. in to a form fill without having to type them in one at a time in the field options? There has to be a simple way to do it, but I have yet to find it.
Hi Cary, please submit a ticket via our Support Portal to get assistance. Have a nice day!
IS there a simple way to convert a text field to another kind of field when the form filler thought it should be text and not a signature or check box?
Hi Tim, please submit a ticket via our Support Portal to get assistance. Have a nice day!
I created a form using Foxit and it works fine on computers, but I can’t see how to make it fill-able using a phone. Is it possible?
Hi Jody,
Thanks for your comment.
Please contact our support to get assistance with your request. You can submit a ticket via our Support Portal or call 1-866-693-6948.
Have a nice day!
Hello, how do I automatically populate fields so that if I enter information in one spot on a form I can have that information automatically appear in some text boxes later in the form.
Hi Alex, here’s an article on how to enable the auto-complete feature: https://kb.foxit.com/s/articles/360040240432-Enable-Auto-Complete-feature-to-fill-in-a-form Is this what you are looking for? In case this doesn’t answer your question, Please contact our support to get assistance with your request. You can submit a ticket via our Support Portal or call 1-866-693-6948.
Have a nice day!
I added text fields and now I want to delete them without disturbing everything else I’ve add to a PDF. How do I delete specific text fields?
Hi Ron, to delete a text field go back to the Form tab, click on the text field icon, right-click on the text field you want to delete and then choose the option Delete. Please feel free to contact our support for further questions.
can i add dynamics table with Foxit like i use to do with Adoe livecycle ?