

- January 25, 2022
- Angela Liang, Director of Marketing and Service

In Foxit eSign, an envelope is a container for documents that you send to a recipient or multiple recipients to eSign. An envelope can have one document or many documents. The envelope holds data on the documents to be signed, the signers and other recipients, and the places where signers will eSign the documents.
To create an Envelope in Foxit eSign you’ll need at least the following :
- One sender with an email address.
- One signer with an email address.
- At least one document to eSign.
Once you have the above information, creating an envelope in Foxit eSign is simple.
Do the following:
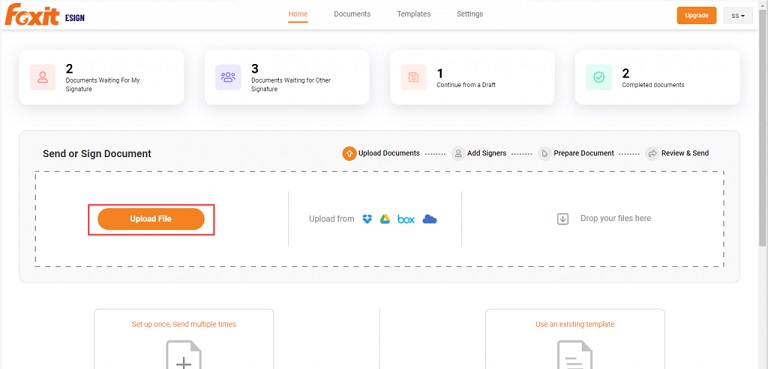
- Upload the file from your computer by clicking ‘Upload File’ under the ‘Send or ESign Document’ section and selecting the PDF file.
- Add the parties that will be signing this document in the next few steps and include yourself as a party by clicking ‘Add Me’.
- Assign each party the level of access you want them to have: view only, fill fields only, or fill fields and eSign the document.
- Click ‘Add New’ to add a new party. If you have sent the document to any party previously, the name will appear in the Recipient Parties dropdown as you start typing.
- Select ‘Enforce Signing Sequence’ if needed. When you enable sequence-based workflow, you will be able to set the workflow path in series combined with parallel by numbering each signer sequence accordingly. If the serial number against the recipient names are the same, they will get notified at the same time and can eSign the documents in parallel.
Here is what to do next:
- Select tags from the left toolbar and drag and drop at the places where you want the sender or recipient to fill out the information.
- Click the field to select. In the field properties, enter the name, select the format as required, and assign to the recipient.
- Select the fillable field and choose the party responsible for providing the value in the field properties section on the right.
- Drag and drop the additional fields and signature box to be filled out during the sending and eSignature process.
- If you want to save this document as a template, select its file name under the ‘Save as Template Copy’ option from the ‘More Actions’ dropdown.
- To send, use the default email template, choose a different email template, or simply edit the language while sending. You can create as many notification templates as required in the ‘Notification Template’ section and assign one as default.