
- January 24, 2023
- Brad Selbst, Sales Vice President
When you create a PDF, it’s important to embed the fonts to ensure that when someone views or prints your document, the fonts you used appear correctly. Because when you’re sharing the PDF with someone who doesn’t have the same fonts installed on their device, the PDF may not look the way it’s supposed to when they view it.
What happens if you don’t have fonts embedded in your PDF file?
If you haven’t included fonts in PDF, anyone who views the PDF document and doesn’t have the required fonts will get a warning that a standard system font will be used instead.
Font substitution can change the document’s look, page flow, layout, and readability. It can cause text to overlap images or move from where you intended it to be.
When you’re preparing files for professional printing, this is one of the most common reasons people ask you to send them as PDFs with fonts included within them.
Embedding all fonts or subset fonts?
You’ve got a number of choices to make when you’re going to include the fonts in the PDF. You can embed all the fonts, only the non-standard fonts, a specific list of fonts, or no fonts at all.
You can choose to embed only the non-standard fonts or a specific list of fonts that you’re currently using. In many cases, choosing not to embed common system fonts or selecting an embedded subset of fonts you’re currently using in the PDF will reduce the file size.
Alternatively, you can choose to embed all the fonts, which is best for printing. Embedding all the fonts will increase the file size but preserve your formatting and keep your document editable.
Embedding is the simplest solution to avoid font substitution
To avoid the possibility that font substitution happens on the recipient’s end when you’re authoring PDF documents, you need to embed the fonts into the file. Whichever option you choose, be it including all fonts or only a subset, embedding the fonts means that no font substitution will occur for them. Users will see the same font that you used in your document and it will look, flow and print the way you intended it.
Using Foxit PDF Editor makes it an easy process. Here’s how to embed fonts in PDF.
How to embed a font to a PDF document in Foxit PDF Editor for Windows
Foxit PDF Editor enables you to automatically embed all the fonts when you add or edit text in a PDF file. It also supports converting an existing PDF file into a new PDF file with fonts included.
The following are different approaches to take for embedding fonts in a PDF document:
- Convert a non-PDF file to a PDF document with fonts embedded
- Convert an existing PDF file into a new PDF file with fonts embedded
- Automatically embed fonts when you add or edit text in a PDF file
Let’s tackle each of these scenarios below.
Convert a non-PDF file to a PDF document with fonts embedded
- Open a file you want to convert to PDF in an appropriate program.
- Go to the File menu, select the Print command, and select Foxit PDF Printer in the Printer list.
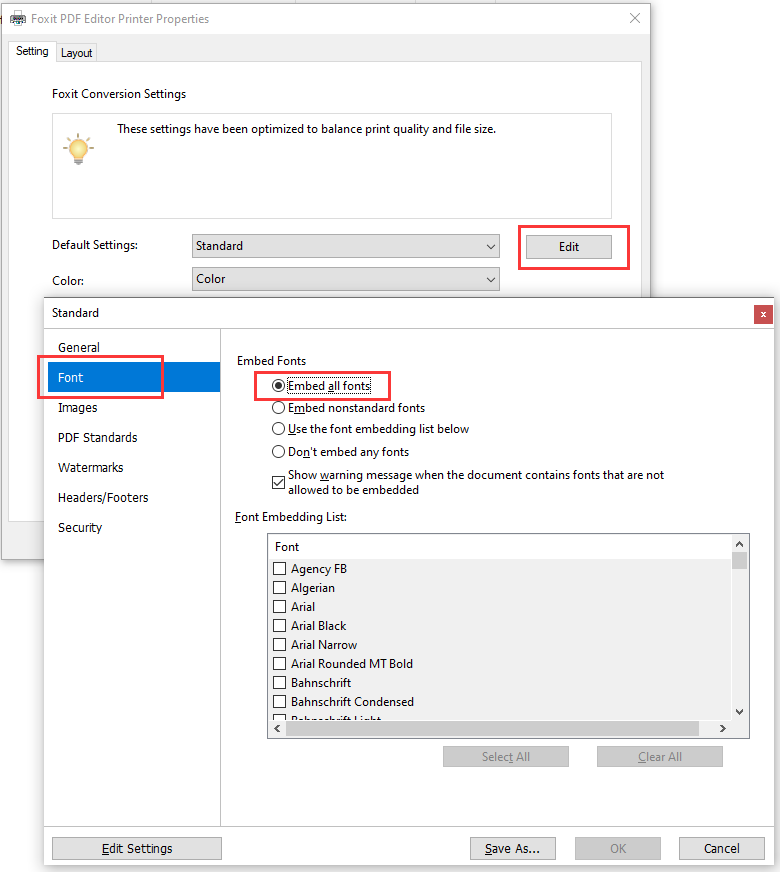
- Click Printer Properties, and click the Edit button in the Setting tab.
- Select Font in the pop-up dialog box, choose Embed all fonts, and then follow the screen option to make changes.
Convert an existing PDF file into a new PDF file with fonts embedded
- Go to File > Preferences in Foxit PDF Editor or hold down Ctrl + K to open the Preferences window. Locate the Print tab, uncheck the option Print text as a graphic (ignore font substitution), and click OK to apply the change.
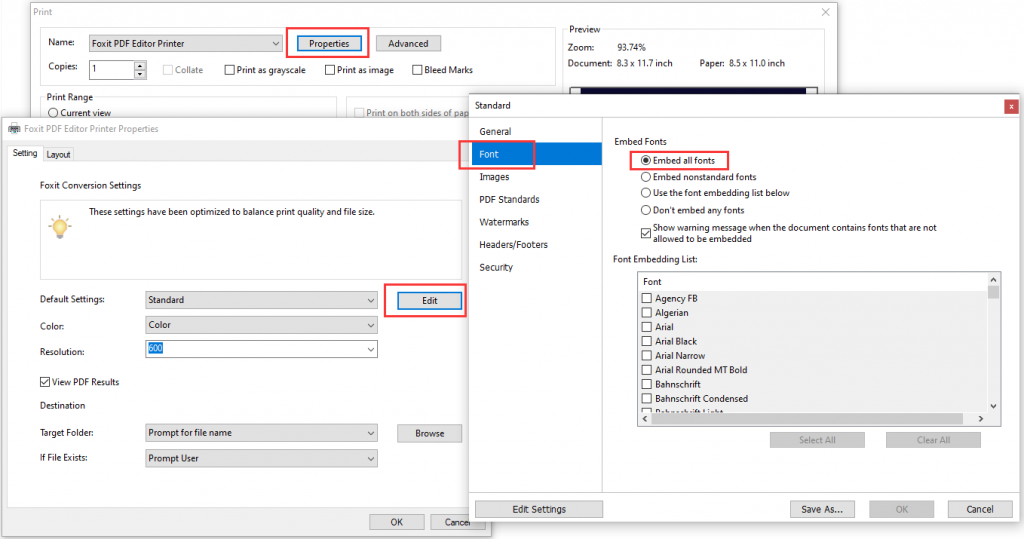
- Open the PDF with Foxit PDF Editor, click on File > Print to open the print dialog box, and choose Foxit PDF Editor Printer.
- Click on Properties to open the Foxit PDF Printer Properties window, and click the Edit button in the Setting tab.
- Select Font in the pop-up dialog box, choose Embed all fonts, then follow the screen option to make changes.
- Ensure you don’t check the Print as image option in the print dialog box. Click on the OK button to print the opened PDF file into a new PDF document.
Embed fonts whenever you add or edit the text in a PDF
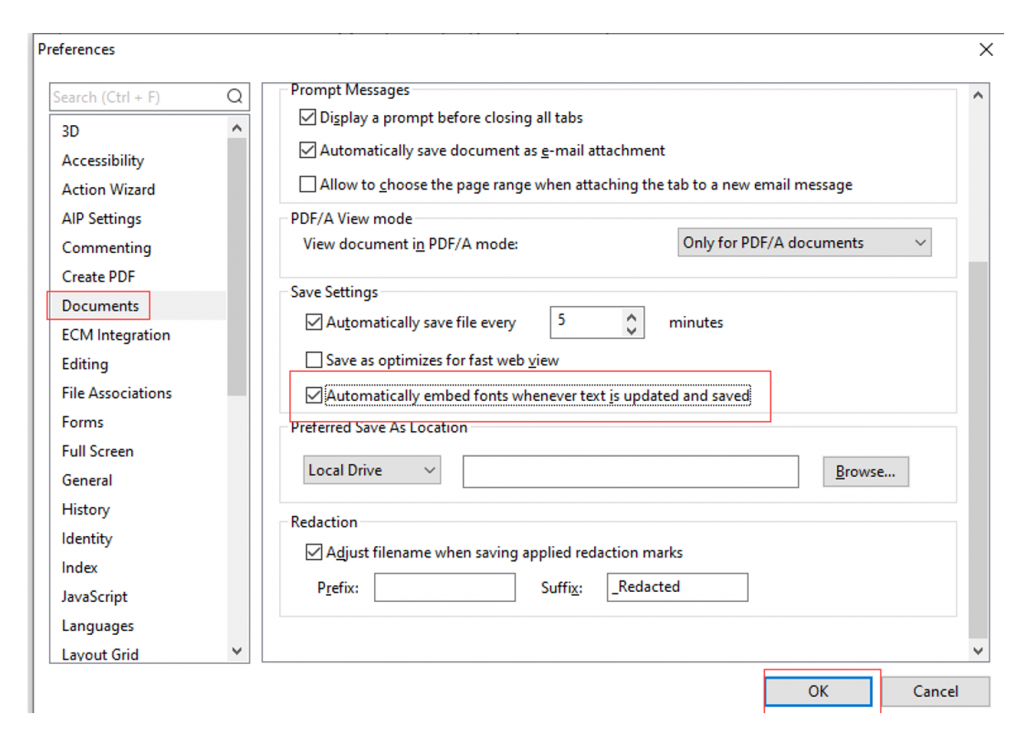
To take the manual and mental work out of this process when you change the text in a PDF file, use the Automatically embed fonts whenever text is updated or saved option. Here’s how:
(Note that this option is available in Foxit PDF Editor version 12.0 and greater. In previous Foxit PDF Editor versions, the PDF file will be converted into a new PDF in which all text objects are placed in path mode.)
In Foxit PDF Editor, go to the File tab > Preferences > Documents, check the option Automatically embed fonts whenever text is updated or saved, and click OK to save the setting.
As you can see, the best part is that automatic font embedding when the text is edited or changed in a PDF saves you and anyone else editing the document from remembering to do it and performing the entire font and embedding manually.
What if you need to remove fonts that have been embedded?
Turn to the Unembed Panel in the PDF Optimizer dialog box in Foxit PDF Editor.
This panel contains two lists for fonts: fonts that are available for unembedding, and fonts to unembed. To unembed fonts in a document, do the following:
1. Select the checkbox for the panel first.
2. Choose one or more fonts you want to unembed.
In the Embedded fonts list and click the Unembed button to add the fonts to the Fonts to unembed list. If you want to only embed the characters (a subset of a font) used in the document, select the Subset all embedded fonts option.
3. Removed added fonts from the unembed list (Optional)
To remove the added fonts from the Fonts to unembed list, select the font and click the Retain button. If you don’t want to unembed any font in the document, select Do not unembed any font.
Embedding fonts in PDF is an important step for any type of document that relies on its design to convey information. By following these simple steps, you can ensure that your PDFs look, print and read the way you intend.
This is good info! Thanks for providing it.
Hi there, Thank you so much for writing this helpful post.
None of the options mentioned above exist on the font view tab
Thanks for your feedback, Ken. Here’s another helpful article: https://kb.foxit.com/s/articles/360040659591-How-to-embed-font-to-a-PDF-document-in-Foxit-PDF-Editor-for-windows